Wednesday, 18 April 2012
Saturday, 21 January 2012
Final Project
Magnifying Glass Project


I like this photograph because it has a strong, sharp, dark colour with the bright flame coming through the glass.

I editted this picture with Photoshop by making two layers and keeping the flame in colour and the rest of the image in black and white. This stops the other distractions leading the eye and keeping the focus on the flame.

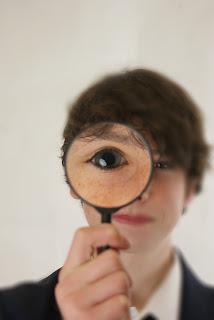


I edited these images on Photoshop by bluring the background and focusing on the magnifying glass and hand. I also changed the brightness and contrast to make the eye stand out. In the first edited image, I used the liquify tool to enlarge the eye. In the second, I used the blur and sharpen tools to focus the eye and changed the brightness and contrast to make the eye look more effective.
For my final project I had the idea of using a magnifying glass to enlarge the specific object that I am photographing. This idea came to me when I was thinking of different ways people look at things.
I tried to take a photo of magnifying glass through the magnifying glass with the shadow circling words 'magnifying glass'. I had to find the word in an english-french dictionary because in the english dictionary I have, the word was not in it.


This was one of the only photographs I could use as an introduction image because when i was taking the picture and trying to enlarge the words the camera would not focus on any words. I tried to move the camera closer to the page to focus it however it still did not work. When I managed to focus the camera it would not enlarge the word to make it look significant compared to the other words.


When I was on my way to school, I saw a shop with a chess board printed to the front window. I thought this could work with my final project. I set up a small table with two sheets of paper covering it, I had a lamp above this to give the image light...

I then placed a glass chess board on the table and used the king in the of the board with the magnifying glass either in the image or creating a shadow to surround the chess piece.


I experimented with the reflection of the light and angled the camera and magnifying glass to see what would happen when the light reflection was on the tip of the chess piece.
I then tried using a different chess board to see if this made the chess piece stand out more against the board.


I experimented with the different chess piece and instead do using the magnifying glass to create a surrounding shadow, I use it to enlarge the object.

I then tried to take the photograph from different angles to see what effect that angle made on the enlargement of the object.

I realised that when using the flash tool, the light just reflected off of the magnifying glass so did not work.

I also tried an experiment with enlarging a person's eyes against their face. For this I used my brother as a model and made him stand next a plain wall with the magnifying glass in front of his eye.

I found that this did not make his eye enlarge by a significant amount so I asked him to hold the magnifying glass further away from him.

I thought this was effective and worked well. I tried to see if the same effect would happen with the other eye, however when he held it to his eye the reflection of the light stopped the effect.


I also experimented with a flame and how large it was through different views. I tried this through a magnifying glass, a glass, on its own with flash.


I like this photograph because it has a strong, sharp, dark colour with the bright flame coming through the glass.

I editted this picture with Photoshop by making two layers and keeping the flame in colour and the rest of the image in black and white. This stops the other distractions leading the eye and keeping the focus on the flame.
I tried it in the glass with flash on however, this just reflected the light off of the glass and did not work, it also makes the flame look smaller and less effective.

This showed not to use flash with glass or reflective objects so I changed the settings and took flash off.
I found that when the flame is infront of the glass the flame looks larger than behind the glass. However, when the flame is inside the glass, it blurs and goes even larger, this ruins the focus and quality of the photographs.
The lighting for the previous images of an enlarged eye were bad quality and poor lighting so I tried the expeiment again in the school studio with better lighting. These images were batter quality and had better light.
The lighting for the previous images of an enlarged eye were bad quality and poor lighting so I tried the expeiment again in the school studio with better lighting. These images were batter quality and had better light.


I edited these images on Photoshop by bluring the background and focusing on the magnifying glass and hand. I also changed the brightness and contrast to make the eye stand out. In the first edited image, I used the liquify tool to enlarge the eye. In the second, I used the blur and sharpen tools to focus the eye and changed the brightness and contrast to make the eye look more effective.
This project relates to the theme exploration and discovery because it is the way people look at life and how things look different with different objects and enlargements in the way. I feel that this project could have gone better if I had more experience and knowledge about photography and what makes a good image and if I had a more advanced camera that has manual focus.
Tuesday, 10 January 2012
Final Project Ideas
For my final project, I was thinking of doing a John Stezaker styled project by using two images and layering one over the other and aligning them to fit. I will edit them on Photoshop to place them together. I have tried some experiments with this idea. I found some braches that had been chopped down, so I moved some of them to make them look like a person or movement of a person.


I realised that this could be too similar to the work of John Stezaker, so I have thought of trying to mix two of my previous projects and merge the idea of illusions and the John Stezaker styled project together. I could do this by taking a picture of a place or an object and holding it in front of my camera when taking the photo so it fits with the background.
Ideas
I have been thinking of some ideas including going to a motor museum and taking pictures of some of the old fashioned cars or buses and some of new cars and buses and merging them together to give the effect that it is one car or bus.
I had another idea that I feel may work. By having old photographs of a building or significant object and printing this off. I then hold the photograph in a certain position so that it gives the illusion that fits in to the landscape. I thought of instead of finding old photographs that may not work, I could take a photo of a public place that would vary in the amount of people and who they are. I would go the next day or week to the same place and position and take the same photograph to see how it varies. I would then use Photoshop to unite these two photographs in different ways. This idea inspired me to think of the ways different people see different things, for example how a paralysed person can see and when looking out of a window they might not be able to see over the window sill so I would take the photogrph with the window sill in the view of the person's sight. I thought that the theme of sight, I should try using a magnifying glassn and enlarge a certain object when taking the photograph.
Tuesday, 20 December 2011
John Stezaker Research
I tried observing John Stezaker's work and looking at the different styles he uses. His work is very intriguing because he layers two different photographs to make them line up. Many of his photos have a man with parts of a photograph of a woman overlaying (or the other way around) or he takes a photograph of humans and another image of nature or land to fit in with humans.


I tried my own experiment of a John Stezaker image by using a self-portrait photograph and an image from the internet of a woman with a face mask on. I used photoshop to layer the two photographs, lined them up, used the line tool to guide me and erased an area of the photograph of the woman.


I tried my own experiment of a John Stezaker image by using a self-portrait photograph and an image from the internet of a woman with a face mask on. I used photoshop to layer the two photographs, lined them up, used the line tool to guide me and erased an area of the photograph of the woman.


I had the thought of the idea of using my photograph and adding a photograph of my brother. Many people have said that we look similar, however I have never seen our similarity. I thought that this image that i edited made us look the same with many facial features and clothing line up.
Thursday, 15 December 2011
Illusions
I tried looking at different illusions and how different they are. I found many illusions on the Internet and they are very intriguing in how they work. Some of them seem as if they are moving, but some have the illusion of two different things that have a connection.
Here is an image that appears to be an old man and old woman staring in to each others eyes, however when you take a closer look you find that there is a Mexican looking man playing a guitar on the old man's face and a man sitting down holding something on his head with a bottle of alcohol next to his leg. Both the Mexican people's arms show as the nose for the old man and woman.

With this next image, there is black cross in the middle and in the outer edge there is a cirlce of pink circles that one disappears then re-appears then the next circle disappears and so-on and so-on. When you look at the black cross, the circle that flashes seems to turn green. However, when you look at the outer circle follow the flash around with your eyes, when it flashes it seems to just disappear rather than turn green.
If you focus your eyes on one particular position then then image flashes green but when you move your eyes the green disappears. I think that that is why the black cross has but put there, to take the focus of the circles away and immediately look at the cross otherwise the illusion would not work because naturally our eyes will follow the flash or change in light/colour.

Some illusions make a two dimensional object look three dimensional by placing it on a different surface. This is what has happened in this image. The bottom end of the bottle has been placed on the end of the lorry whilst the rest of the bottle has been placed on the side of the lorry. This only works from the angle that the photographer has taken it and at the angle that the bottle has been put on the lorry. It has also been painted so that it appears to be inside the lorry and the bottle neck is sticking out of the lorry.

This next image has a line of straight black and white lines that look wonky and at different angles, however when looked at closely you can see each individual line, you can notice that they are all straight.

In this image, there is a circle of a series of curved lines that lead into the centre of the image. Outside of this circle there is another series of curved lines that are smaller in the closer to the centre they are. When you look at the image, it appears to be moving but if you stop moving your eyes it appears to stop.

I think that with illusions, it is based on what are eyes focus on first and how our brain figures out the different images and views in the image. Some of them are more complex and take longer to figure out, these ones I find more intriguing and are usually more complex.
Here is an image that appears to be an old man and old woman staring in to each others eyes, however when you take a closer look you find that there is a Mexican looking man playing a guitar on the old man's face and a man sitting down holding something on his head with a bottle of alcohol next to his leg. Both the Mexican people's arms show as the nose for the old man and woman.
With this next image, there is black cross in the middle and in the outer edge there is a cirlce of pink circles that one disappears then re-appears then the next circle disappears and so-on and so-on. When you look at the black cross, the circle that flashes seems to turn green. However, when you look at the outer circle follow the flash around with your eyes, when it flashes it seems to just disappear rather than turn green.
If you focus your eyes on one particular position then then image flashes green but when you move your eyes the green disappears. I think that that is why the black cross has but put there, to take the focus of the circles away and immediately look at the cross otherwise the illusion would not work because naturally our eyes will follow the flash or change in light/colour.
Some illusions make a two dimensional object look three dimensional by placing it on a different surface. This is what has happened in this image. The bottom end of the bottle has been placed on the end of the lorry whilst the rest of the bottle has been placed on the side of the lorry. This only works from the angle that the photographer has taken it and at the angle that the bottle has been put on the lorry. It has also been painted so that it appears to be inside the lorry and the bottle neck is sticking out of the lorry.
This next image has a line of straight black and white lines that look wonky and at different angles, however when looked at closely you can see each individual line, you can notice that they are all straight.
In this image, there is a circle of a series of curved lines that lead into the centre of the image. Outside of this circle there is another series of curved lines that are smaller in the closer to the centre they are. When you look at the image, it appears to be moving but if you stop moving your eyes it appears to stop.
I think that with illusions, it is based on what are eyes focus on first and how our brain figures out the different images and views in the image. Some of them are more complex and take longer to figure out, these ones I find more intriguing and are usually more complex.
Tuesday, 13 December 2011
Nick Knight
I have been looking at a photographer called Nick Knight to try to get inspiration and ideas for my final project. I have noticed how he uses a variety of colour and tries to bring attention to certain features of the model. His photos are very abstract and unusual by using different shapes, colours and textures.

I find that this image brings attention to the lips and eyes. He used th black background to focus our eyes on the womans face. The warm red colours lead our eyes first with the woman's left eye because there is less colour showing in that area.
He also takes photographs that are edited to make a person merge into an animal or object, for example in this he makes a woman look like lots of snakes by dressing her in multicoloured lycra clothing that brings texture to the photo.
Tuesday, 22 November 2011
Experiments
In our lesson we were asked to create three different experiments to change the composition and way we look at the photograph by putting the photo in different places or adding things to the photograph.
Burial Experiment
For this experiment I used a photograph of me and changed it to black and white. I then printed this on to photographic paper and buried it in my back garden. I have left it for two days and I am going to see how the ground and any insects or animals eat and erode it. This will change the composition and what comes to our attention on the photo last. Here is the photograph I am using...


 I found that the darker black absorbed the red colour for example in the eyes and on the collar, where as the colour has been taken out from the lighter colours on my arm and the upper part of the bench.
Layered Photograph
In this experimant, I used photoshop to add and change the photograph. I used photographs off of the internet that mean something to me. I used a photograph of my brother surfing and adapted it to give the effect that he was surfing out of the cup that I am holding. I also used a Newcastle United badge on the cup and changed it to look as if it was curved and part of the cup, I used this because I have always supported Newcastle and my favourite player was Alan Shearer so I added a photograph of him and made all of these black and white. After creating this image, I tried to upload it to my blog however, it said that the image was too large to upload so I have changed the properties of the photograph and here is the result...


Burial Experiment
For this experiment I used a photograph of me and changed it to black and white. I then printed this on to photographic paper and buried it in my back garden. I have left it for two days and I am going to see how the ground and any insects or animals eat and erode it. This will change the composition and what comes to our attention on the photo last. Here is the photograph I am using...


I feel this did not turn out as well as I thought it would because the photograph did not erode much and it only got soggy and muddy. I think that this is because it was on photographic paper which is thicker therefore stronger than ordinary paper. Also I think it may have eroded and would have transformed more if it was in the ground for longer than two days.
Water Experiment
For this experiment i had the idea of placing a photograph of me in a bowl of boiling water and adding different food dye to it. I was inspired to do this because I had to place my gum-shield in boiling water to fit it. I then thought that I could try placing the photograph in the water and adding red food colouring to it and leaving it for five minutes. I prepared another bowl of boiling water with the food colour ready to put in. After placing the same photograph in red then coffee coloured dyes I had these results...


Layered Photograph
In this experimant, I used photoshop to add and change the photograph. I used photographs off of the internet that mean something to me. I used a photograph of my brother surfing and adapted it to give the effect that he was surfing out of the cup that I am holding. I also used a Newcastle United badge on the cup and changed it to look as if it was curved and part of the cup, I used this because I have always supported Newcastle and my favourite player was Alan Shearer so I added a photograph of him and made all of these black and white. After creating this image, I tried to upload it to my blog however, it said that the image was too large to upload so I have changed the properties of the photograph and here is the result...

Adapted Photograph
For this experiment I used Photoshop to layer two photographs over eachother. I layered the picture of me over the picture of the man and changed the image of the man to fit the eyes, mouth and face with my self-portrait image. I then used the rubber tool on Photoshop to rub out parts of my image to leave parts of his image showing. I changed the bottom part of my face and added his bears and moustache from his picture. However, because I had to change the size of the image of the man, it has come out less sharp and a little blurred. Here is the result of the image.

Subscribe to:
Comments (Atom)